 |
Unit II - Preparing to Ride |
|
|
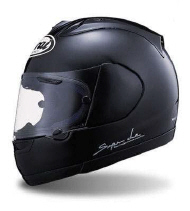
Section A: Personal Protective Gear Protective gear has several purposes, including providing comfort, increasing visibility, and offering protection. Motorcycle protective gear helps you stay comfortable and provides improved visibility if it is brightly colored and reflective. Also, protective gear can provide protection against the elements in all kinds of riding conditions and, in the event of a crash, it may prevent or reduce injuries. Every rider and passenger should wear sturdy over-the-ankle footwear with non-slip soles, long pants, a good jacket, full-fingered gloves and, above all, a helmet manufactured to meet Department of Transportation (DOT) standards. a. Helmet Construction There are four basic components of a DOT-approved helmet that work together to provide comfort and protection. They are: 1) an outer shell, 2) an impact-absorbing liner, 3) comfort padding, and 4) a retention system. Be sure that if a helmet takes an impact, it should be inspected and replaced as necessary. b. Choosing a Helmet While color, design and price will be a part of your decision about which helmet to buy, protection should be the first consideration. A full-face helmet gives the most protection since it covers all of the head and face. This design has a flip-up face shield that protects the eyes. A three-quarter or open-face helmet can also offer protection. It is constructed with the same basic components, but doesn't offer the face and chin protection of full-face helmets. If you wear and open-face helmet, you should use a snap-on face shield or a pair of goggles. Ordinary glasses or sunglasses are not sufficient eye protection for a motorcyclist. They can shatter or fly off, and they allow wind and airborne objects to reach the eyes. Full-faced Open-faced
To find a well-made helmet, look for the DOT or Snell sticker on the outside of the helmet. c. Footwear Sturdy over-the-ankle boots help protect riders from a variety of riding hazards, such as stones that get thrown up from the roadway. They also prevent burns from hot exhaust pipes. Rubber-soled boots with low heels provide a strong grip on the pavement and help keep feet on the footrest. In the event of a crash, boots can provide valuable protection against foot and ankle injuries. d. Gloves Full-fingered gloves protect hands from the wind, sun, heat, and cold. Gloves that fit snugly will improve grip on the handlebars as well as reduce hand fatigue. Sturdy, reinforced motorcycle gloves help protect hands in the event of a fall. If gloves are too bulky, it may be difficult to operate the controls. e. Jackets, Pants, Riding Suits Quality motorcycle protective gear will provide comfort in all conditions, and it can help you avoid being distracted by adverse environmental conditions. In case of a crash, good quality protective gear may prevent or reduce injury. Protective gear sold specifically for motorcycling will provide the best combination of fit and protection. Leather is a good choice because it is durable, wind resistant, and provides protection against injury. Remember that even in warm weather, constant exposure to wind may cause hypothermia. Hypothermia, a condition of subnormal body temperature, can cause loss of concentration, slowed reactions, and loss of smooth, precise muscle movement. In such conditions, proper protective gear like a wind proof jacket and insulated layers of clothing are essential. It is wise to dress in layers so that layers can be removed as desired. f. Rain Suits A rain suit or a waterproof riding suit is a must. A dry motorcyclist will be much more comfortable and alert than a rider who is wet and cold. A feature to look for is elastic in the waist, pant legs, and sleeves. High visibility orange or yellow colors are good choices.
Pre-Ride Inspection Pre-ride inspections help ensure a trouble-free ride and provide confidence that your motorcycle will respond quickly. The primary source of information about how a motorcycle should be inspected and maintained is it's owner's manual. It's quick and easy to check the critical components, and a convenient reminder is T-CLOCS, which should be checked before every ride. T - Tires and Wheels
C - Controls
L - Lights and Electrics
O - Oil and Other Fluids (coolant, hydraulic fluid, fuel)
C - Chassis
S - Sidestand
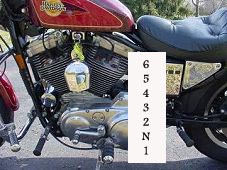
Section B: Controls Both hands and feet are used in operating and controlling a motorcycle. It is important to know the location and operation of all of your motorcycle's controls, and to develop and practice smooth and precise coordination when using them. Primary Controls The handlebars are an important component of any motorcycle because it is the most common way to initiate and control motorcycle lean. Here are other primary controls found on a motorcycle, the ones that make it go and stop. Throttle: It is the right handgrip and it controls engine speed. To increase engine speed, roll the throttle toward you. To decrease engine speed, roll the throttle away from you. Clutch Lever: The clutch lever is located in the front of the left handgrip. It is operated with the fingers of the left hand. The clutch connects power from the engine to the rear wheel. Gearshift Lever: It is found on the left side of the motorcycle in front of the left footrest and is operated with the left foot. "Lift" up fully to go to a higher gear; "press down fully to go to a lower gear. A typical gear pattern is 1-N-2-3-4-5-6. The N is for neutral, which is selected by either a "half lift" from 1st gear or a "half press" from 2nd gear. Most motorcycles have five gears, but some have four or six gears.
Front Brake Lever: It is found in front of the right handgrip and is operated with the right hand. "Squeeze" it in to operate. Rear Brake Pedal: It is found in front of the right footrest and is operated with the right foot. "Press" it down to operate.
Other Controls and Equipment The location and operation of many of these other controls/equipment vary from motorcycle to motorcycle. The best source of information for your motorcycle is it's motorcycle owner's manual (MOM). Fuel Supply Valve: It controls the flow of gasoline to the engine. Most motorcycles have one, but some are fully automatic and not accessible to the rider. The positions are ON, OFF, and RESERVE. Ignition Switch: It is usually located near the instrument cluster. It's positions usually include ON, OFF and LOCK, and some include a PARK position. Choke Control: It is located either on or near the handlebars, or on or near the engine. It provides an enriched fuel mixture to assist in starting a cold engine, and provides a fast idle to permit the engine to warm quickly. It should be turned OFF as soon as the engine is warmed. Engine Cut-Off Switch: It is near the right handgrip and is operated with the right thumb. It allows you to shut off the engine without removing your hand from the handlebar. Turn Signal Switch: It is usually located near the left handgrip and is operated with your left thumb; most must be manually turned off after a turn or lane change, but some turn off automatically after a turn. Horn Button: It is usually located near the left handgrip and is operated with your left thumb. Starter Button: It is usually located near the right handgrip, and is operated with your right thumb. Speedometer: It is part of the instrument cluster and shows the motorcycle's road speed. An odometer is often included to show miles ridden, as well as a re-settable trip meter. Tachometer: If there is one, it is part of the instrument cluster and indicates engine speed. It has a "red line" that should never be exceeded. Indicator Lights: These can include neutral, high beam, turn signal indicators, oil pressure, side stand down, and possibly others. Side & Center Stands: They support the motorcycle when parked. Not all motorcycles have both stands. They are usually spring-loaded.
Section C: Basic Riding Skills Information Here are a few basic procedures to help you in riding. Starting and Stopping the Engine A procedure called FINE-C is used to start the engine. It stands for Fuel, Ignition, Neutral, Engine cut-off switch, and Choke/Clutch. Fuel Supply Valve: Turn the fuel valve ON ("vacuum" valves do not have on "off" position). Ignition: Turn the ignition switch to the ON position. The indicator lights should come on. Neutral: Shift the transmission to NEUTRAL; check to be sure by rolling the motorcycle with the clutch lever released and front brake released (don't rely on the green light in the instrument cluster). Engine Cut-Off Switch: Put the switch in the RUN/ON position. Choke/Clutch: Set the choke as needed (ON for a cold engine). To start the engine with and electric starter, press the starter button. To stop the engine, move the engine cut-off switch to OFF. Turn the ignition switch to OFF. Turn the fuel valve to OFF if your motorcycle has a manual valve.
Using the Friction Zone The friction zone is that area in the travel of the clutch lever that begins where the clutch starts to transmit power to the rear wheel and ends just before the clutch becomes fully engaged. It is a region of partial engagement in which the clutch "slips" to permit you to precisely control engine power to the rear wheel.
Riding Posture Good posture helps you maneuver the motorcycle more easily. Keep your back straight, and head and eyes up. Keep both feet on the footrests near the controls. Keep the knees and elbows comfortably in. Arms should be relaxed and bent. The wrist should be positioned low on the throttle.
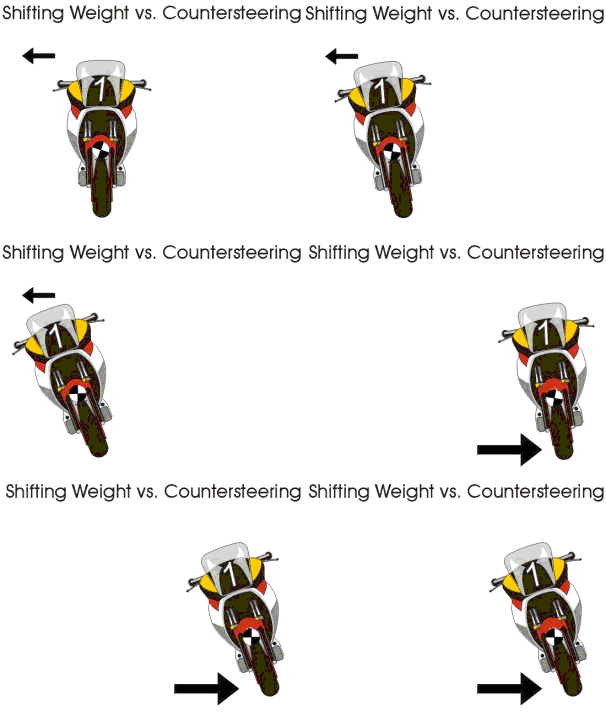
Turning There are four basic steps to turning a motorcycle: slow, look, press, and roll. Slow: Reduce speed before a turn as needed by rolling off the throttle and applying both brakes; downshift if necessary. Look: Turn your head to look where you want the motorcycle to go. Keep your eyes up, looking as far as possible through and beyond a turn, and keep your eyes level with the horizon. Press: To initiate motorcycle lean, press forward on the handgrip in the direction of the turn. This is called countersteering. Press left, lean left, go left. Press right, lean right, go right. Roll: Roll on the throttle throughout the turn. (Be sure to slow enough before the turn so this can be accomplished.) Avoid deceleration or rapid acceleration while in a turn. In most situations, you and the motorcycle should lean together. In slow, tight turns like a U-turn, use a counterweight technique by leaning your upper body toward the outside of the turn. Turn your head and look where you want to go.
|


